Detail View – Collections
The detail view reflects the contents of a collection. It consists of two sub-views: one that displays the files in the collection, and another that displays the collection participants. Via the detail view, you can edit the collection properties and manage files and collection participants.
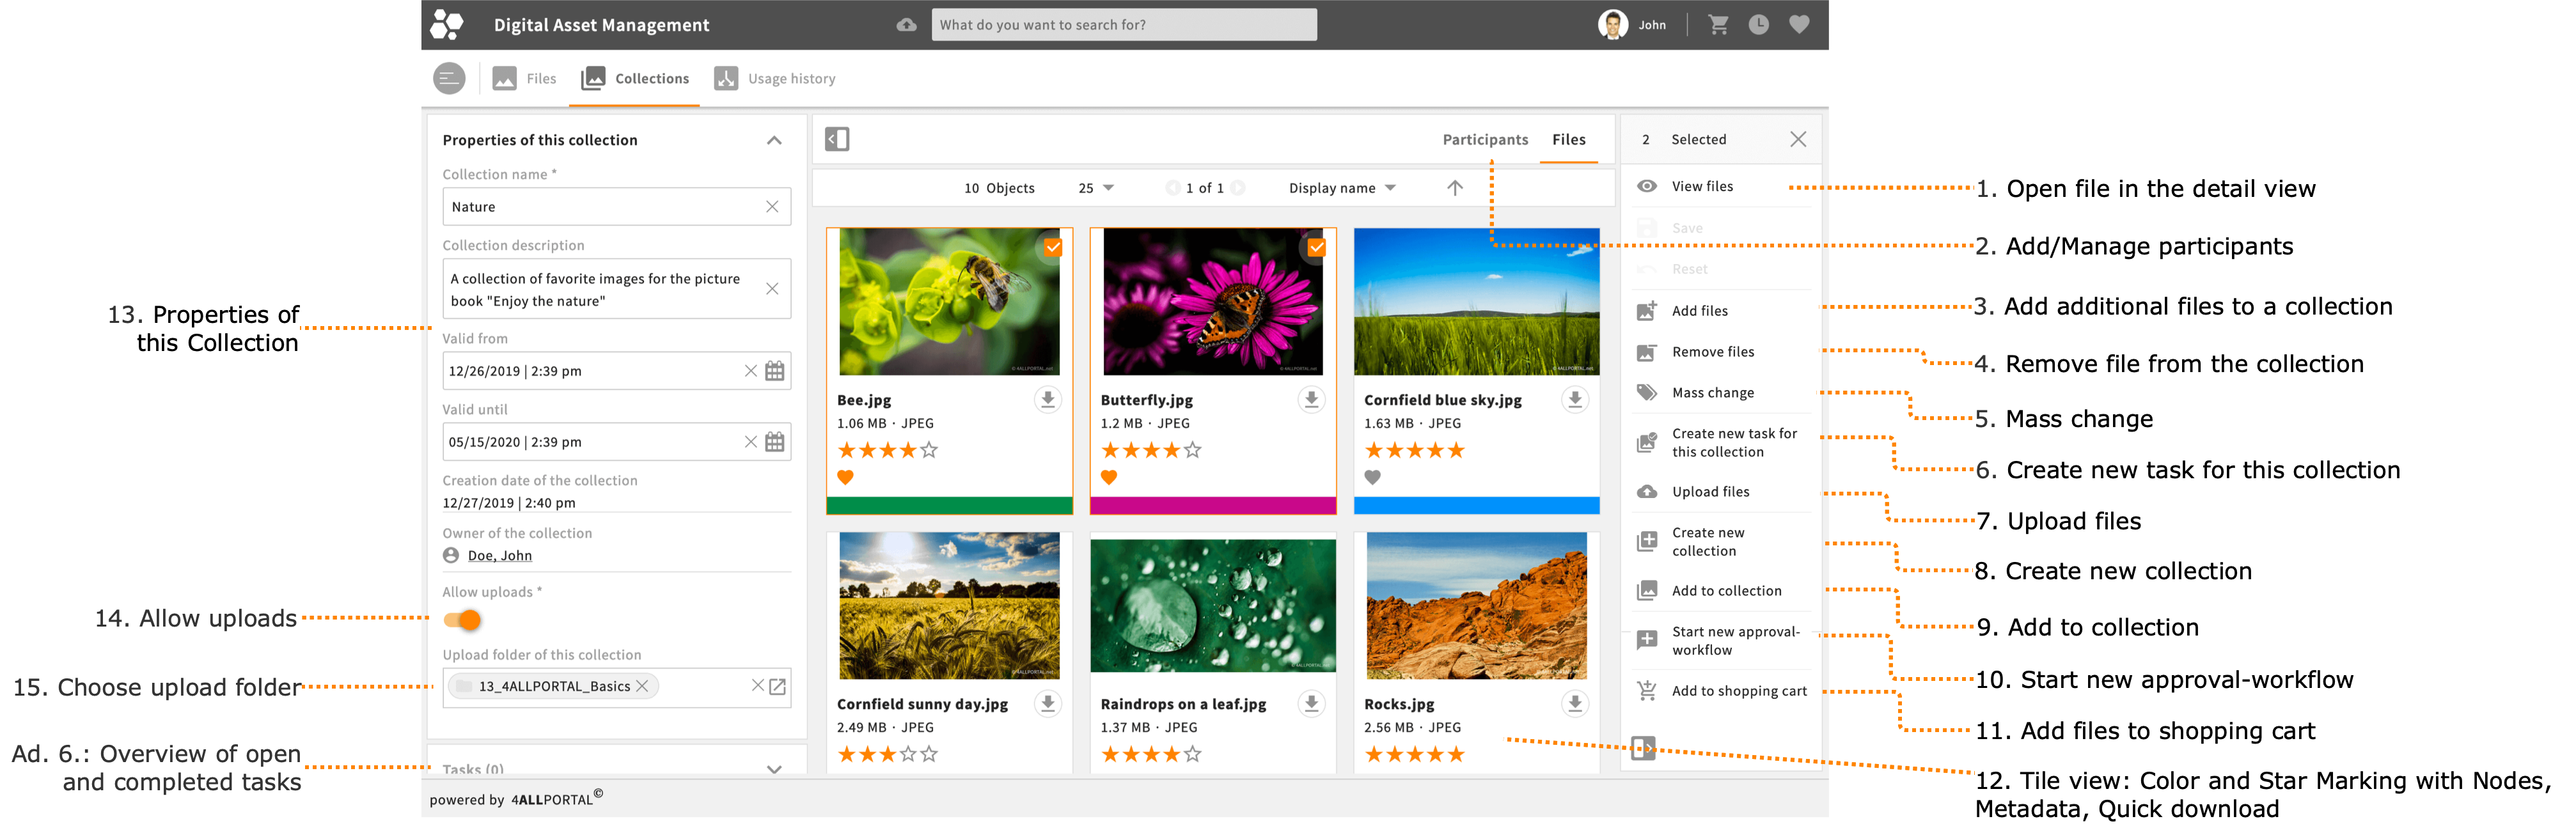
1. Open file in the detail view
Click the "View" icon to open selected files in the detail view.
2. Add/Manage participants
Click the “Participants” icon to add additional participants to a collection, delete participants, or manage collection permissions.
The procedure here is similar to the one described in chapter Create a New Collection, except that you manage individual users and user roles within one window.
If you change the collection permissions of existing participants, they will be informed of their new permissions by e-mail.
After adding or deleting participants, or assigning new permissions to a participant, make sure to click the “Save” button to save the changes you’ve made.
3. Add additional files to a collection
- Click the “Add files” icon to add additional files to the collection.
- Use the search fields to search for files from the Files module.
- Select files.
- Click the "Add selection" button to add the selection to the collection.

Note: After you have added files, they will no longer be displayed in the list.
Search fields are customized for your organization. A separate search area is usually defined for each user role. For example, user role “Marketing Department” can use different fields to search for files than user role “Product Manager".
You can find further information in chapter Search Fields .
4. Remove file from the collection
Click the “Remove files” icon to remove selected files from the collection.
You are only deleting the selected items from the collection, not from 4ALLPORTAL.
5. Mass change
Click the “Mass change” icon to tag files simultaneously with metadata.
You can find further information in section Mass change.
6. Create new task for this collection
Click on the “Create new task for this collection” button to create a task for the entire collection.
If there are outstanding or completed tasks for a collection, you can see this in the left-hand side menu below section “Properties of this collection”.
You can find further information in chapter Task Module.
7. Upload files
Click the “Upload files” button to upload new files and simultaneously add them to the collection.
This requires permission to upload files for the collection.
The procedure is the same as for Upload and Import with Drag & Drop (Collections Module), with the difference that you select the files via your computer’s file manager.
8. Create new collection
Click on the “Create” button to create a new collection.
You can find further information in chapter Create New Collection.
9. Add to collection
- Click on the “Add to collection” button to add files from the collection to another collection.
- Use the search fields to search for collections from the Collection module.
- Select a collection.
- Click the "Add selection" button to add the files to the selected collection.
10. Start new approval-workflow
Click on the “Start new approval-workflow” button to create a task for the entire collection.
You can find further information in chapter Approvals Module.
11. Add files to shopping cart
Click the "Add to shopping cart" icon to add selected files to the shopping cart to download them.
12. Tile View: Color and Star Markings with Notes, Metadata, Quick Download
By default, the detail view for collections shows you the tile view. The tile design with the displayed metadata details, the color and star markings with notes, as well as the quick download are identical to what you see in the Files module.
You can find further information in chapter Basics.
13. Properties of this collection
Displays the properties of the respective collection.
As the owner/creator of a collection, you can edit its properties. Additionally, participants with the collection permission "Edit" can also edit its properties.
14. Allow uploads
Activate the “Allow uploads” toggle switch to enable yourself and the collection participants to upload files directly into the collection.
You can find further information in section Upload and Import with Drag & Drop (Collections Module).
15. Choose upload folder
When uploading files into a collection, you or the participants can freely select an upload folder where the files are to be saved. This may result in a disorderly uploading of files in various folders.
To allow you to better organize the uploading of files for a collection, it is possible to assign a fixed upload folder to the collection. If this is done, there will be no option offered for selecting an upload folder when uploading files and the files will be saved in your specified folder.