Basics
This chapter will explain the basics of operating your 4ALLPORTAL. The user interface was designed to operate the same way across nearly all modules. Using the relevant functions will quickly become routine.
What are objects?
Due to the fact that the user interface operates across multiple modules, the word “objects” is used as a global term for “data”. Depending on the module in question, an object might be a file/asset, a personal contact, or a record with product information.
After you log in, 4ALLPORTAL opens with the start-up module “Files” in the main view. Objects are displayed in “tile view”.
Note: This start-up view is the 4ALLPORTAL default. The start-up view for your DAM system may have been customized for your organization.
The following screenshot explains the functions in the main view.
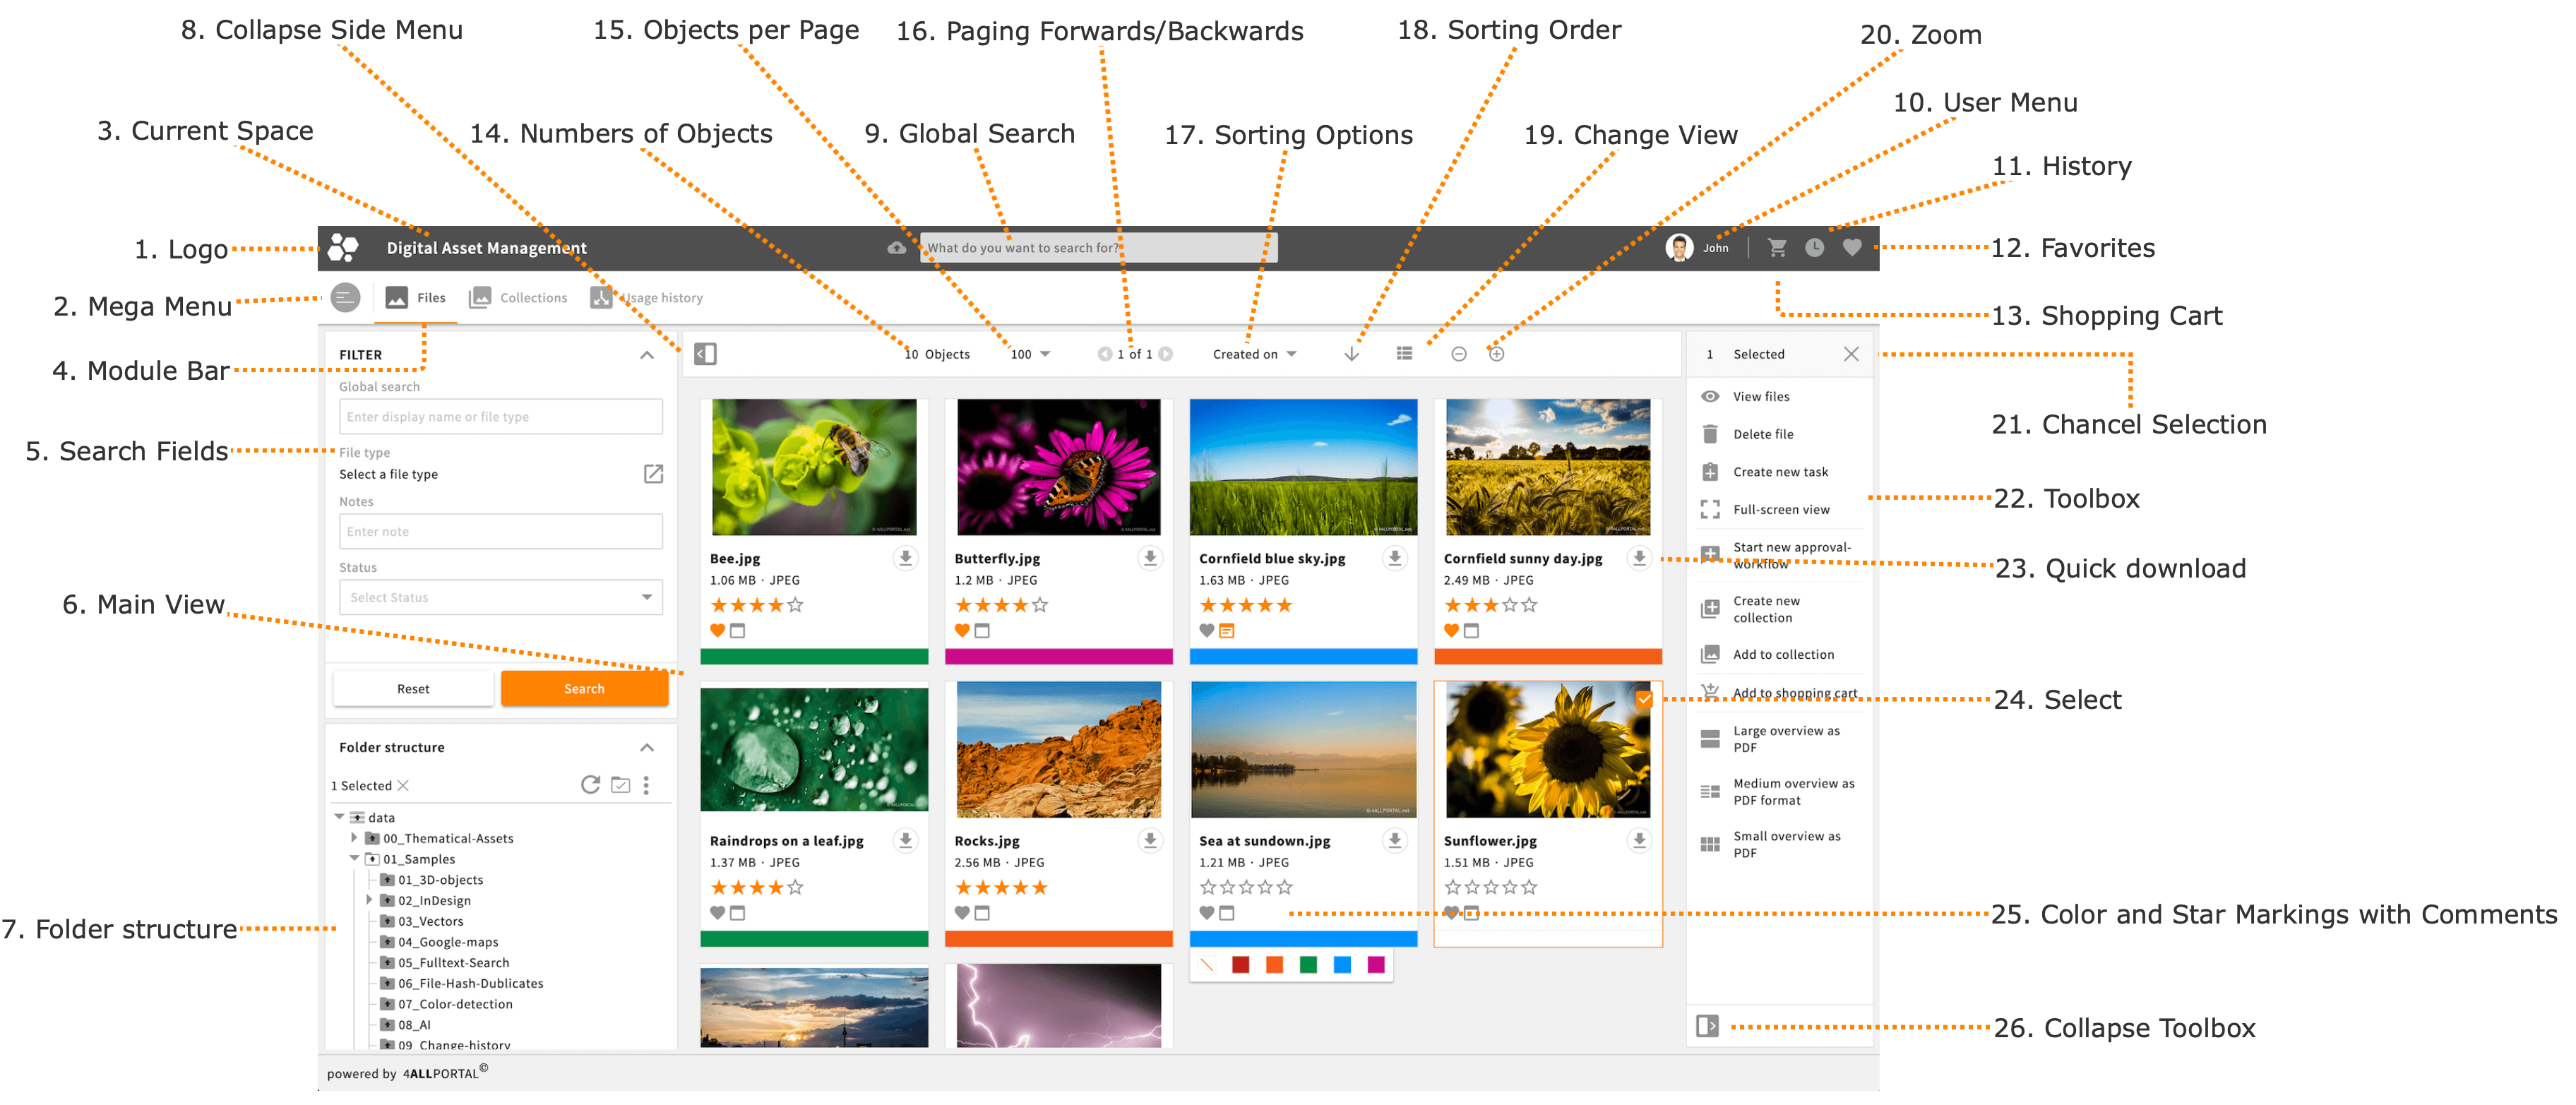
1. Logo
Click the logo to navigate back to the start-up module.
2. Mega Menu
![]()
A click on the “Mega-Menu” icon will open the Mega-Menu. You can use this menu to navigate to other spaces (module groups).
You can find further information in section Mega-Menu and Spaces.
3. Current Space
Shows the current space from which a module has been opened.
In this example, a module has been opened from space “Digital Asset Management”.
4. Module Bar
Shows the available modules in a space. Click a module to navigate to it.
The orange line under the module name indicates the module currently open.
5. Search Fields
Search fields allow you to perform a targeted search for objects in your 4ALLPORTAL. This screenshot shows an example with fields for a search based on the display name and/or file type.
Note: Search fields are customized for your organization. A separate search area is usually defined for each user role. For example, user role “Marketing Department” can use different fields to search for assets than user role “Product Manager".
You can find further information in section Search fields.
6. Main View
The main view displays the objects available in a module. Objects can be assets such as images or documents, but also records such as a contact entry, a task, or a collection.
7. Folder Structure
Using the folder structure, you can navigate through the folder and file system. Click the checkbox next to one or more folders to display all the assets they contain in the main view.
You can find further information in chapter Folder Structure.
8. Collapse Side Menu
Click the icon to collapse the left-hand side menu. This will increase the display area for the main view.
9. Global Search
The global search can find objects from multiple modules within 4ALLPORTAL and open them directly in the detail view.
The 4ALLPORTAL default settings allow you to use the global search to find objects from modules “Files,” “Contacts”, and “Companies”.
Enter a search query into the field, and your search results will be displayed immediately below the field. Click on a result to open the respective object in the detail view.
Refine your search with further parameters.
You can find further information in chapter Global Search.
Note: Your global search may have been customized to include different or additional modules.
10. User Menu
A click on the “User” icon will open the user menu. From there, you can navigate to the user settings, open the help function/this user manual, or end your 4ALLPORTAL session by logging out.
11. History
A click on the “Clock” icon will open or close the sidebar with the history. There you will be able to see which objects you have used.
You can find further information in chapter History.
12. Favorites
A click on the “Heart” icon will open or close the sidebar with the favorites. There you will be able to see which objects you have set as favorites
You can find further information in chapter Favorites.
13. Shopping Cart
Click the “Shopping Cart” icon to navigate to the shopping cart. You can use the shopping cart to download files/assets from the DAM.
You can find further information in chapter Shopping Cart Module — Downloading and Sharing Files.
14. Number of Objects
Indicates how many records (called “objects”) a search query has found.
Indicates how many objects a folder or module contains.
15. Objects per Page
Click the number or the “Triangle” icon to select how many objects the main view should display per page.
16. Paging Forwards/Backwards
Click the right or left “Triangle” icon to page forwards or backwards in the main view.
17. Sorting Options
Click the name or “Triangle” icon to select the criterion according to which you want to sort the objects in the main view.
The following options are available:
| Created on | Date object or file was created in 4ALLPORTAL |
| Modified on | Date object or file was modified |
| Display name | Object name or file name |
| File type | For example JPEG, DOCX |
| File size | File size in bytes |
The sorting criteria may have been customized to include different or additional options.
Please note:
The sorting function is limited in the product standard to a number of 15,000 objects. When displaying more than 15,000 elements in a module, the sorting function is deactivated for performance reasons.
In such cases, we recommend to limit the displayed objects by using search filters and / or folder selections.
18. Sorting Order
Click the “Arrow” icon to change the sorting order of the objects in the main view.
As you can see here, the default sorting order is descending from Z to A, 9 to 0, or earliest to latest creation date in 4ALLPORTAL.
19. Change View
Click the “View” icon to toggle between tile view and list view.
20. Zoom
Click the “plus” or “minus” button to change the size of the tile view.
Note: After switching modules or closing the user session and logging in again, the zoom will be reset to the default setting.
21. Cancel Selection
Click the “x” button to deselect selected objects. If no objects are selected, the button will not be displayed.
22. Toolbox
The toolbox provides you with a range of different actions and/or functions, depending on the module in question.
For example, you can create or delete objects, display them in full-screen or detail view, add to a collection, or create a new collection.
Note: Toolbox functions are usually customized for your organization. The options and functions available to you depend on your user permissions. Another user may be able to use options that you cannot use as a result of your restricted user permissions.
23. Quick download
Click the "download" icon to download an file immediatley. This feature only exists in the module file.
You find futher information in section Quick download.
24. Select
Click the checkbox at the lower right of every tile to select the relevant object. The “Bee.jpg” tile illustrates selected object.
Selecting this object will bring up further options and functions in the toolbox that you can apply to this object.
25. Color and Star Markings with Comments
By clicking on the “Color” dropdown icon, the “Star” icons, or the “Comment” icon, users can add markings and comments as standard options via a global ratings set. All users will be able to view these markings and comments.
Positioning
The component for the markings and comments is available in the main and detail view as well as in the full screen view of module Files.
Search
The search enables you to find files based on their color and star markings as well as the comments.
For space reasons, the search component is not shown in the above screenshot.
Markings
- Rating files with up to five stars
- Marking files with five colors (red, orange, green, blue, magenta)
(colors can be customized – globally)
Comments
- Texts of up to 1000 characters possible
Rights management
User rights for marking and comments can be assigned via roles for “View, Create, and Edit”, or only for “View”.
26. Collapse Toolbox
Click the “Chevron” icon to collapse or expand the toolbox. Collapsing it will increase the display area for the view.
Additionally, you can click the “Chevron” icon above metadata fields to collapse or expand a metadata group.
Note: After closing and reopening the detail view, the toolbox is always expanded. Metadata groups are always expanded after a user logs in again.